This project was time consuming, and tricky at times, but really fun overall! So, we decided to share a detailed tutorial and tips/mistakes we figured out along the way in case any of you want to try to re-do your own table!
We found a great tutorial from {Addicted 2 Decorating} from a Pinterest pin and tweaked it along the way to make it work for what we wanted our table to look like.
So without further ado!
How to Make Your Own Round Table Top
First of all, you'll need a few supplies to get started. We purchased a majority of our supplies from Lowe's, but when we needed to get extra sand paper and a new sander we went to Home Depot which was closer.
1/ You'll need a piece of wood that is 2x12x16 OR two pieces of wood that are 2x12x8. Have someone at the store cut the board into 4 pieces that are 4 feet long. So, if you get the 16ft, cut it into 4 pieces, if you get the two 8ft pieces, cut both in half. Definitely make sure your pieces of wood don't look warped and look as straight as possible. You'll want a pretty good quality piece of wood if you want to eliminate a lot of sanding. We got a mid-grade piece of pine.
2/ You'll need lots of sand paper. In the picture we have 120 grit, but we ended up going back to Home Depot and getting 60grit and 100grit for the initial sanding, then 180 for fine sanding to finish it. I would also highly recommend getting an orbital sander if you do not have one and getting the sandpaper discs. We learned the hard way and started out without an orbital sander and had to buy one and extra sand paper to go with it!
3/ Get quality wood glue. We used Elmer's. Don't get the small bottle. We ended up adding more glue several times just to be safe.
4/ Get quality wood filler. We went with Elmer's again. We definitely didn't need that large container, but it was okay since we'll likely need it for other projects down the road.
5/ Pick up some shims to help to support the boards when you glue them together and clamp or strap your boards.
6/ Please use face masks!! And if you don't have protective goggles, pick up a pair of those as well.
7/ You'll need a jigsaw with a smooth cut blade. We didn't have one so we purchased one from Black & Decker at Lowe's. It came with a blade so we used that one and it didn't break and did a pretty decent cut.
You'll also need:
-two 1 x 2in. furring strips about 30 inches long
-#8 wood screws 1 3/4" long
-tack cloth to clean up sanding dust
-a router (if you choose to use this)
-primer
-stain or paint
-a finisher like polyurethane or lacquer
1/ First, lay your boards next to one another making sure that the the boards fit the best you can. We had to move around the boards a few times to find the way with the least about of space between boards. Use a flat surface like a table or wooden "horses".
2/ Second, use a generous amount of wood glue to glue boards together one at a time. We ended up adding more glue if we saw gaps. Also, the glue will drip. Make sure you don't have anything valuable under or around where you are gluing. We put two pieces of wood underneath the boards as well as the old table to keep the boards stable and elevated.
3/ Third, you need to use 24" clamps or sturdy straps to hold the glued boards together. You may choose to use shims to help to support the boards and to prevent making marks on the boards. We used 2x2 boards to leverage our straps as well. We used straps from Frank's car racks since the clamps we had were not big enough. It worked fine, but I'd definitely recommend using clamps over straps.
4/ Make sure everything is tight, but you also want to make sure nothing is warping (i.e., tight but not so tight that the wood starts to bow). And then, you need to wait at least 24 hours for the glue to dry!
Then...once everything is dried...time for all the measuring!!
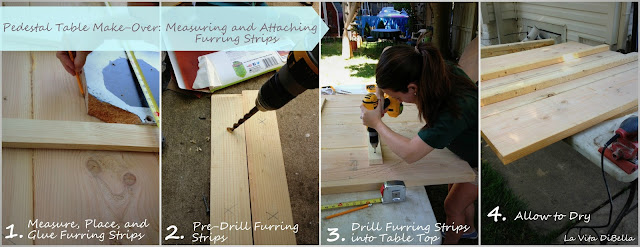
1/ Once everything is dry, you'll want to measure...and check your measuring. And, possibly, re-measuring. (you get the picture). We wanted to measure the table first. So we placed the old table top on top of our boards and measured around the edges to make sure each side was even. Then, we measured about 1 inch wider than the table for our first cut. You want to leave room for tons of sanding and uneven cuts.
Cut your furring strips and you can also taper the ends if you want.
Then, you want to measure where you're going to place your furring strips. We were going to attach our table top to a square board, so we used the one from the old table top to make sure we left enough room between our furring strips for that. It's important to think about how you're going to attach the table to the base before you measure everything!
Then, measure where you're going to place your screws to drill the furring strips. We used pencil to mark on the furring strips and made sure the placement was even on both.
2/ Next comes one of the most important steps. Pre-Drill. Do not forget this step. Please. If you do, you could completely split your table before you've even tried to cut it. Then, it's back to the hardware store and starting from square one. Does not sound fun? Pre-Drill.
3/ Now, once you've pre-drilled, you can use wood glue to place your furring strips onto the table boards and screw your furring strips into place. This was my favorite part. Power tools!!!
4/ My least favorite step that seemed to repeat itself alot...Allow to Dry. It's so hard to wait!! Good thing I had a ton of painting to do...
I sanded down and primed the pedestal base. Then, I applied two coats of Martha Stewart's Nimbus Cloud from Home Depot.
Next, it's time to make the first cut!! We double checked our measuring and practiced on a junk piece of wood since we had never used a jigsaw before. Then, we cut around the outer traced circle for the first cut and we cut from the underside rather than on top so that the table would lay flat. It took two people to rotate the table since we used a table rather than "horses".
Then, it's time to sand!! (please notice that this is complete sarcasm...sanding was terrible).
For 3 days...yes 3 days we used this sander and the original sand paper we bought at Lowe's.
After all that time we started to get frustrated. We continued to use a level to check to see if our table was flat yet, and it wasn't. The ends of our table began to warp upwards and the joints where the boards were glued seemed to be impossible to sand down.
On the third day I broke down and tears thinking that we had failed and that we would need to start over. I heard from some people that we had purchased the wrong wood, that we glued them the wrong way, and that we needed a different sander. So, we decided the only thing we could do at this point was get a different sander.
Best. Choice. Ever! This little orbital sander saved our table and possibly our sanity!
Learn from our mistake and save 3 days of your time and get the orbital sander first! This thing worked wonders and in an afternoon our table was finally as level as it would get! And super smooth!
Once you feel your table is pretty level you may choose to use wood filler to clean up any dents, knots, and the joints between the boards. We used Elmer's brand and it worked great!
You do have to...yep, you guessed it, WAIT again. The wood filler needs to dry for 2-4 hours before you can sand it and 24 hours before you can prime, stain, or paint it.
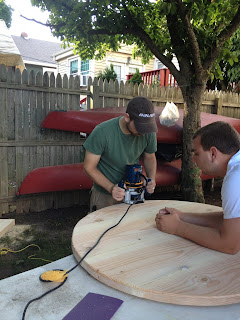
After about 3 hours we sanded everything down and then used Frank's brother's router to clean up the edges of the table.
After the grain was nice and smooth, we applied three coats of stain to the table top and three coats of polyurethane all over the table top and lacquer on the pedestal and chairs for protection. We used Minwax.
We made sure we waited 24 hours for the table and chairs to dry and 36 hours before actually using the table to make sure the protective coating was completely cured. Then, we used the square board to drill the table top to the pedestal.
And, voila! A few weeks later....we have a "new" table! (It only took us so long since we had nowhere to paint/stain/build in our apartment, so we had to visit Frank's mom's home to do most of the work).
Introducing our brand "new" kitchen table:
 |
| Summer 2013 |
So, what do you think?
Keep in Touch with La Vita DiBella!


.JPG)
.JPG)
.JPG)
.JPG)


.JPG)
.JPG)
.JPG)

.JPG)
.JPG)


.JPG)
.JPG)


