Monday, February 18, 2013

Happy Almost Spring!


Happy Monday everyone! Well…I guess happy what’s left of Monday everyone…I’m not complaining that Monday is almost finished!

I hope you all had fabulous weekends! Frank and I had a very full weekend! Our weekend was full of crafts, family, visits with friends, and Frank’s hockey game for the league he’s playing for. He won big time which was very exciting! One thing I totally enjoyed about staying at my parents’ house was NOT doing laundry, dishes, or cleaning! It was entirely relaxing.

I was excited when it was time to come home, though. There’s something about coming home to your very own bed. And…I could NOT wait to hang up the bulletin board I made! If you missed my post about the burlap bulletin board I did this weekend, you can see that {here}. Frank was actually the one who volunteered to hang it up as soon as we got home…at 10pm mind you…I knew right then that I married the right man! (Just kidding...but not really) I can’t wait to show you how it looks, but I’m making you all wait for the final reveal of our re-decorated office space. I promise I’ll hurry it up!

Anyway, is anyone else done with Winter? I am. Can we start to count down the days to Spring yet? In the interest of looking forward to less ice, warmer weather, greener grass, and new decorations…I thought I’d share some of my brainstorms for Spring inspired decorating ideas and projects. Enjoy!

I just love the greens and yellows of fresh Spring flowers, don't you?


In an apartment, I don't have access to fresh flowers all the time, so one way to decorate with green is to use very easy to take care of succulents. I've seen them at Walmart for only $3.50!


I'm usually not one to use the typical Spring decor like eggs and bunnies, but I love the idea of using an old-looking watering can as a vase that works either indoors or outdoors.


A trend I've been noticing on other decorating blogs and in decorating magazines is the combination of the recent obsession-worthy monograms with moss-- another way to use green!

Source: hgtv.com via Brittany on Pinterest


And some inspiration for a wreath I'm making in the very near future...Some greens or flowers, easy to switch out with the changing of seasons, and a monogram. Simple but fresh and inviting. 


What have you been brainstorming for Spring?

Saturday, February 16, 2013

Burlap Bulletin Board

I hope you all are enjoying your weekend! We are spending the weekend at my parent's house visiting friends and family. Frank visited his grandparents for a while and I visited a very dear friend for lunch at Cracker Barrel! It was so nice to just relax and chat about life. Such a stress reliever!

Another stress reliever for me is doing a project! So, of course I brought my project to my parent's house and roped them into helping me...

Remember that burlap I showed you on Thursday?


And remember a few weeks ago when I brainstormed this project (here) ?

burlap memo board and thumbtacks
Source
Well, this is what I did!


Isn't this a much prettier alternative to just a plain ol' bulletin board?  And a HUGE upgrade from our original cork board squares?


I would say that is a big fat YES!

So, as I explained in my post on Thursday (here), I picked up this burlap for about $7.99 at Jo-Ann's Fabric. I just got one  yard and ended up with much more than I needed. I also picked up two boxes of black upholstery pins to make a border. 


We had previously purchased a plain cork board from Target for $5.99. We also needed a staple gun, a hammer, and a utility knife. I took out the clamp to use in order to pull the burlap tight enough, but I ended up just using another person (my Mom) to help me hold it together while I stapled. Apparently she trusted I wouldn't sever one of her fingers!


First I had to cut the burlap to size. You want to leave about 2- 2 1/2 inches around the outside to pull on to make it tight. You can trim this later. 

Lay the bulletin board face down and start in the middle on one of the sides by pulling the fabric tight and punch 3 staples to hold it in place. We stapled the burlap into the wooden frame, but we found that we needed to use the hammer sometimes if the staple did not go all the way into the wood. 
(Once the project was over we realized that it may have been easier to staple onto the board part instead...)


Then, just work your way around a few staples at a time. We did 3 staples in the center of each side. Then, we went back around and did 2 staples on either side of the original 3 staples. Continue until you've stapled all the way around pulling tight each time you staple.


We left the corners alone until everything else was stapled and turned the board around to make sure everything looked okay so far.


Then, we trimmed the excess fabric a bit to make the corners a bit easier.

For the corners, we stapled each side of the point and then folded the corner down flat. There are probably a few ways to do this, but the key is the make sure everything is folded down enough so that you don't see bulk from the front.


Because this particular board had metal plates for hanging, we cut out the squares around the plates with a utility knife. This worked, but required an extra staple on either side to keep the fabric from pulling away from the area that was cut.


We added a few extra staples to make sure everything was secure and flipped the board over to work on the upholstery pins. These are entirely cosmetic. But I really liked the way it seemed to finish it off!

I used a yardstick to evenly measure where I'd put my pins and pushed them into the cork a bit to hold them in place.


Then, I just tapped them in with a hammer going all the way around and making sure they were all straight.


Then,... voila! A MUCH prettier bulletin board!


The whole project took about an hour and a half...mostly because we had to call in for assistance since some of our staples weren't staying in...Daaaaad! Can you help us!? But overall it's definitely an easy and fairly cheap project.

Bulletin Board from Target- $5.99
Burlap (1 yard) - $7.99  (plain burlap was $3.99...I kind of splurged for the pretty print)
Upholstery pins (2 boxes) - $1.99 ea.

I can't wait until we get home to hang this below our shelf I showed you yesterday! (here)

What do you think?
                      

Friday, February 15, 2013

Home Organization 101: The Office, an Update

A few weeks ago I showed you our before pictures of the office space in our living room and showed you how much work we have ahead of us! (here) I also wrote a Wednesday Wish List post on some ideas I have for transforming our pretty dull work space into a place we would want to spend time working. (here)

Since it's been a while since I've talked about it, I just wanted to give you all an update. Since I last shared we have installed a shelf.


We wanted to bring some height and depth to the area which the shelf definitely accomplishes. Also, we wanted to bring some black items to the space. Since our office is just in a corner of our living room, we wanted to make the space stand out apart from the rest of the room by using a color, black, that we did not use elsewhere. At the same time, we also wanted to use colors that still flowed with the rest of the room which is why we will continue to incorporate white and green into the space.


Obviously there is still a good deal of work to be done as far as filling up the other wall space, working on adding interest to the actual desk and chair, as well as doing a better job organizing the drawers. But, it's a work in progress and we have a few projects planned for the near future that will bring us closer to a completed office area.


Do you have an office space that is within another room? How have you designed the space to make it either separate or integrated into that room?

A Bunch of Burlap

So, I picked up something special for a project I'll be working on this weekend.  I couldn't wait to show you all! 


Did you all know that they make printed burlap now!? I didn't. I went to Jo-Ann's Fabric yesterday afternoon and found this gem. I couldn't believe how pretty this burlap is! 


Can you guess what I'll be using it for?

On another note, I hope everyone's Valentine's Day was wonderful, however you decided to celebrate (or not celebrate) it. Frank and I decided to keep it very low key and just had a simple candlelit dinner and some champagne that we never drank on New Year's Eve...since we both fell asleep before midnight! 
I can almost hear you all judging us right now... 


What did you do to celebrate? 

Look out for my post this weekend on my burlap project! I am so curious to hear what you think I'll use it for. 
Hint: I've mentioned it as a project I was going to attempt at some point...


Happy Friday everyone! 

Saturday, February 9, 2013

Falafel Pita

Tonight I tried a new food. Falafel. Ever tried it? I've heard all about it and I've seen it in many recipes on Pinterest, but never got around to trying it myself. 


I've seen recipes to make falafel from scratch on Pinterest like these:


But, when I was recently at the grocery store I noticed a falafel mix and figured I'd give it a try!


All you do is mix 3/4 cup water with the mix. It's an all organic mix with no crazy ingredients. 
Then, you have to let it sit for 10 minutes to harden a bit.


Then, you heat 1/4 cup of vegetable oil in a frying pan for 3-5 minutes and form the falafel into patties. Fry the patties for about 4 minutes each side until they are browned and hardened. 


I couldn't help but notice the view of the pretty wall art above the coffee station from the oven. 


When the falafel is cooked, drain remaining oil and serve over a green salad or in a pita. 


It's a healthy and easy meal! Perfect for a single serving when the hubby is out and leftovers for lunches! I would definitely buy the Nature's Earthly Choice falafel again. Then, maybe one day I'll be adventurous and make my own from scratch!

Do you like falafel? Have a good falafel recipe?

Friday, February 8, 2013

Cash Envelope System

So with only one of us working a full-time job, things can be tricky when it comes to the saving and budgeting department. Over in the DiBella household, we've found that budgeting can look pretty great on paper, but then in real life it doesn't always quite work out as well. Then, at the end of the month we're wondering why our budget went out the window. Anyone else experience that sometimes?

Before Frank and I got married, we went through what we call at our church "marriage mentoring". Instead of doing the usual pre-marriage counseling, it took place with another couple that was getting marred a few weeks before us and a couple that has been married for 12 years. It was a great experience to hear from a married couple the struggles, challenges, and joys of marriage. They did a great job of preparing us for what was ahead--difficult and exciting things. 

One of the things we focused on for a couple weeks was learning to manage finances together, to budget well and stay out of debt. Well...being that Frank has his master's already and I will have mine in a few months, the whole "staying out of debt" thing isn't happening. It's more like how do we get out of debt as quickly as possible?

Dave Ramsey changed our world. Seriously. This man developed a ground-breaking budgeting program called Financial Peace University. I encourage you to follow that link to check out some of his stuff. We own the book and the workbook and have been following his plan called the "debt snowball". He encourages people to start with their smallest debt and work their way up so that you experience small and fairly quick victories keeping you motivated to work towards the tougher debt to tackle. 

Financial Peace | [Dave Ramsey]
Buy it on Amazon
One of the things Dave Ramsey suggests is to pay for things in cash instead of credit. To do this, he suggests  what he calls the "envelope system". To do this, each category on the budget (ex. gas, groceries, household items, etc) has its own envelope. Routinely, either each month or each paycheck, the envelope gets filled with what was budgeted for that item with cash. The key is to only use what is in that envelope and no more. This prevents over spending and helps to reveal the reality of the amount that was budgeted. 

I've found that it's a great system, if you keep up with it. Having 5 or 6 envelopes floating around in my purse just wasn't cutting it for me. Also, I felt so strange holding white envelopes at the cash register rather than a wallet. 

Insert this brilliant lady!


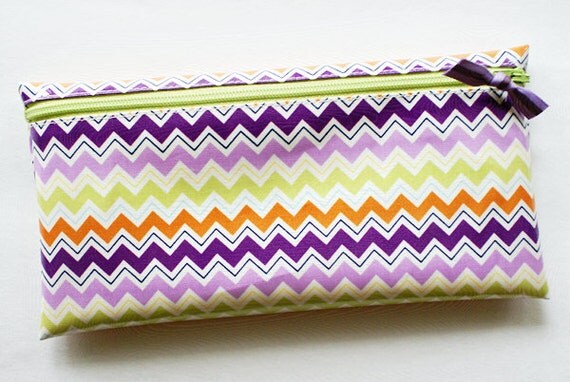
She makes the prettiest little wallets made particularly for Dave Ramsey's envelope system!

Cash budget envelope system wallet with 6 tabbed dividers // purple, lavender, orange, apple green, yellow, white chevron
A Time for Everything Etsy Shop
Cash envelope system budget wallet with 6 tabbed dividers //  navy, green, turquoise, red, blue, pink floral
A Time for Everything Etsy Shop
Aren't they so cute!? When I saw her site advertised by A Bowl Full of Lemons, I had to buy one! They look so pretty they actually make me want to really commit to the envelope system. 

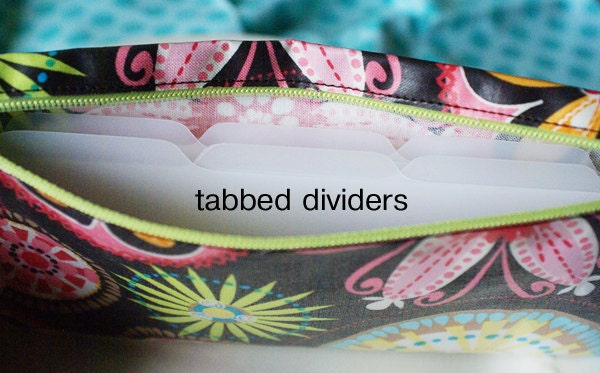
I ordered mine that very day and was anxiously waiting for mine to arrive. When you order your own wallet, there are a huge variety of pretty fabrics to choose from as well as a few different styles. They come with plastic dividers that you can label with your own categories from your budget or you can custom order dividers pre-labeled for a few extra dollars. 

Cash envelope system budget wallet with 6 tabbed dividers //  navy, green, turquoise, red, blue, pink floral
A Time for Everything Etsy Shop
Here's the one that I purchased!


Isn't it adorable!? I already started using it. I actually want to make cuter labels for them using either washi tape or a label maker I've been waiting to get once I find a good sale/coupon. 

So, what do you think of the envelope system?